Gather Your Materials

First, you’ll need some rushes or straw (about 12-18 inches long), scissors to trim them, and some twine or elastic bands to hold everything together. Make sure you have a comfy spot to work in – it’s time to get crafty!
Prepare the First Reed

Take one of your rushes and hold it vertically in front of you. This is your starting point, and is going to be the spine of your beautiful cross.
Fold the Second Reed

Now, grab your second reed and fold it in half. You’re making a neat little bend, so it forms a perfect “V” shape when you lay it down.
Position the First Reed

Place that first vertical reed right in the middle of your folded second reed, lining them up nice and straight. Press the spot where the two reeds meet, between your thumb and forefinger. This keeps everything steady, so your cross doesn’t collapse before you even get started.
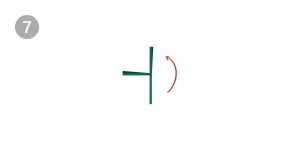
Rotate 90 Degrees

Now for the fun twist (literally)! Turn the two reeds you’re holding 90 degrees counter clockwise, so the open ends of the second reed are pointing straight up.
Add the Third Reed

Grab your third reed and fold it in half, just like you did before. Place it horizontally across the two parts of the second reed, making sure it’s lined up nice and even with the first reed.
Turn Again
Hold the centre tight, and yes – turn everything 90 degrees counter clockwise again! This will get the open ends of the third reed pointing up, just like the others.
Continue Adding Reeds

Keep the magic going by adding a new folded reed with each rotation. Every time, turn everything 90 degrees to the left and keep layering those reeds over each other, weaving them into your growing cross. The more you do it, the better it looks!
Secure and Trim

Once your St. Brigid’s Cross looks full, it’s time to secure everything with some elastic bands or twine. Tie up the arms of the cross firmly so it holds its shape, and then grab your scissors to trim the ends into equal lengths.
Display Your Cross
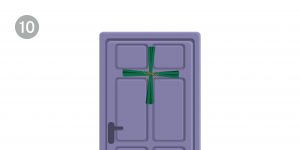
Now that your St. Brigid’s Cross is complete, hang it somewhere special in your home. Traditionally, people hang them on the door or above a window to invite blessings and ward off evil.
https://www.knittingtours.com/knitting-tours/10-night-south-ireland-knitting-tour-aran-islands/